Installation of fan insert and upper part of housing
- Switch off mains fuse and fit warning sign
- Check ease of movement of shut-off shutter/backflow preventer. When installed, the shut-off shutter/backflow preventer must close automatically. For ER-APB, this must close automatically when the yoke spring used is pressed.
 Degree of protection not guaranteed if the housing floor seal is incorrectly positioned or missing.
- Insert seal into lower part of housing, flat and without any creases, smooth out if necessary.

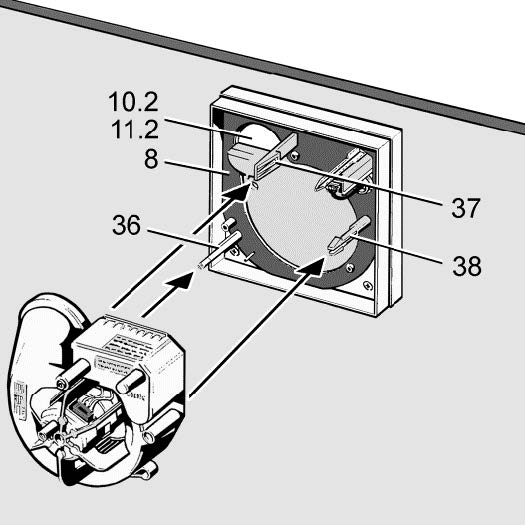
8
Sealing
10.2, 11.2
Shutter
36, 37, 38
Fixing points
- Check position of housing floor seal and correct if necessary.
 Function will be impaired if fan insert is not inserted correctly.
- Ensure proper insertion in the locking hooks.
- If the fan insert is not firmly seated, screw it to the housing at the 3 positions shown in the figure above. Suitable mounting material is to be provided by the customer.
- Check that all screw connections are tight.
- Check ventilation ducts for dirt and clean if necessary.
- Check that connection data matches technical data on the unit (Unit rating plate).
→ Installation information in unit
- Slide fan insert evenly, in parallel, onto both studs. Ensure that the two locking tabs of the stud and the locking lever audibly engage so that the fan insert is secure.
 Damage to the unit. Degree of protection is not guaranteed if in the wrong installation position.
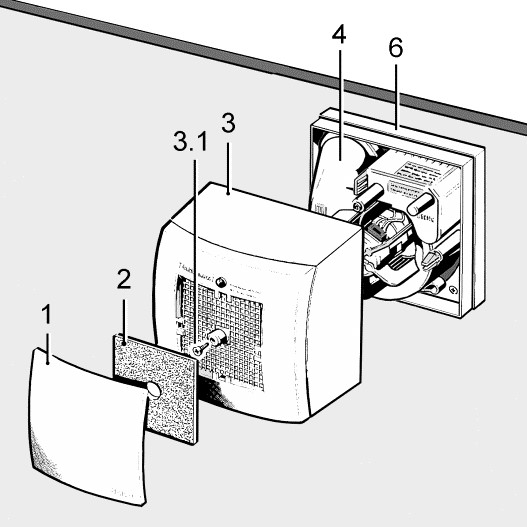
- Only fit upper part of housing with the Maico name in the bottom right.
- Attach upper part of housing and fasten with central screw.
- Check that filter mat is fitted correctly.
- Affix time strip (→ Title page) and push the activation button all the way.
- Fit cover (MAICO name on bottom right). The cover must audibly click into place.

 Upper part of housing can only be fitted in one position. Ensure that the two arrows on the upper part of the housing and the words “exhaust socket” are facing the exhaust socket.