Conversion of exhaust socket for air outlet towards rear
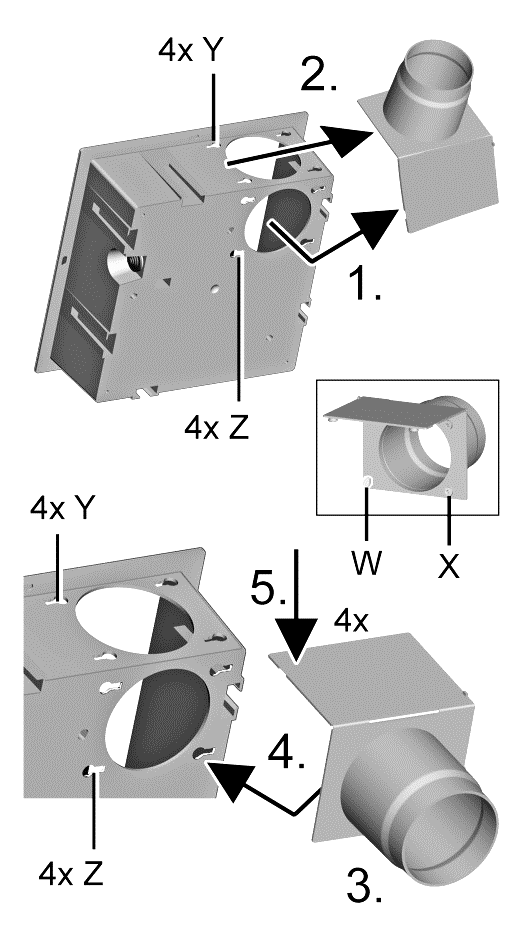
3 | Shutter |
Z | Positions |
X | 4 locking bolts |
W | 4 bayonet hooks |
Y | 4 slots |
 Before the conversion, pull the shutter out of the exhaust socket.
- Fig. at top: At the 4 positions, loosen (pull off) the 4 locking bolts (push buttons) on the exhaust socket.
- Push the 4 bayonet hooks in the exhaust socket at the side into the 4 slots to the right and remove the exhaust socket.
- Fig. at bottom: Rotate the exhaust socket so that it is pointing to the rear.
- Place the exhaust socket onto the housing and push with the 4 bayonet hooks (at rear) to the right into the slots right up to stop.
- Push the 4 push buttons into the housing holes on the upper side of the housing at positions [Y]. These must audibly engage.
 If the air exhaust socket is installed incorrectly, the function of the unit is impaired.
- Ensure that all locking bolts and push buttons are engaged and that the socket is flush with the housing.
- Check for correct installation of the exhaust socket.
- Insert the shutter into the exhaust socket as described in the Left air outlet direction installation position: Preparing the shutter.