RLS 45 K: Additional functions on 230 V input
 For electrical connection → Installation instructions for final installation kit, connection diagrams.
The 230 V AC input of the RLS 45 K permits operation with an additional function by means of switching (with switch, button).
When additional functions are switched on, the Demand-driven operation LED flashes.
Select one of the following additional functions in service mode:
- Sleep mode
- intermittent ventilation
- Safety function (External OFF)
- Supply air mode with overrun time of 0 min.
- Supply air mode with overrun time of 6 min.
- Supply air mode with overrun time of 15 min.
The function of the 230 V input is only ever taken into account on the directly controlled RLS 45 K. Additional room air controls continue to run in the previous ventilation level. The LED indicator for the automatic function flashes slowly.
Exception: The safety function (External OFF) impacts on all the ventilation system’s room air controls. If this is triggered, all the system's ventilation units switch off regardless of the control/power unit to which they are connected.
Sleep mode function
(time-limited switch-off)
Sleep mode with ventilation level 0: Function only with RLS 45 K / DS 45 RC
| Sleep mode is possible in any operating mode. Press key for 2 seconds, the |

 LED flashes slowly. On RC units, all 3 LEDs light up and then go out one after another.
Operating time of 60 minutes (Can also be set to a time of between 15 and 120 minutes with the commissioning software). Once this time has elapsed, the ventilation unit switches back to the previously used ventilation level. To cancel, press a key.
External switching on the 230 V input of the RLS 45 K is also possible with a button.
Intermittent ventilation function
(time-limited intensive ventilation)
Intermittent ventilation with ventilation level 5: Function only with RLS 45 K / DS 45 RC
| Intermittent ventilation is possible in any operating mode. Press key for 2 seconds, the |

Operating time of 30 minutes (Can also be set to a time of between 5 and 90 minutes with the commissioning software). Once this time has elapsed, the ventilation unit switches back to the previously used ventilation level. To cancel, press a key.
External switching on the 230 V input of the RLS 45 K is also possible with a button.
External OFF function
This function can be used to switch off all the ventilation system's ventilation units.
Function for supply air mode air with overrun time for exhaust air units or PPB 30
If the system detects, via the 230 V input, that an exhaust air unit has been switched on, all PP 45 ventilation units connected to the RLS 45 K take on volumetric flow compensation.
Volumetric flow compensation is defined as a total of 60 m³/h (for exhaust air units) or 45 m³/h (for PPB 30 units), divided between the number of ventilation units.
It is important that the right number of units is configured in service mode.
Through the connection of the PPB 30 K unit to the RS 485 interface and subsequent activation, the PP 45 units convey 45 m³/h of supply air. Therefore, a combination of PPB 30 Kwith exhaust air units, with volumetric flow compensation, is not possible if these are connected to the same room air control.
Recommendation: Only use exhaust air units with an exhaust air volumetric flow of 60 m³/h, e.g.. ER 60 ..., ECA 100 ipro ....
Once the set overrun time has elapsed, the ventilation units switch back to the previously selected ventilation level.
If exhaust air units have an overrun timer (6 or 15 minutes), the timer can be set in service mode on the RLS or with the commissioning software.
Be sure to observe the information in the connection diagram and the number of units set in service mode.
The operation of exhaust air units with sensor-controlled, automatic start-up is not detected by the RLS.
Connecting components
 Danger of electric shock if incorrectly connected to the 230 V input of the control.
Ensure a phase balance between all components connected to the ventilation system.
- Install additional components (buttons, switches, exhaust air units etc.) and wire up electrics → Associated instructions.
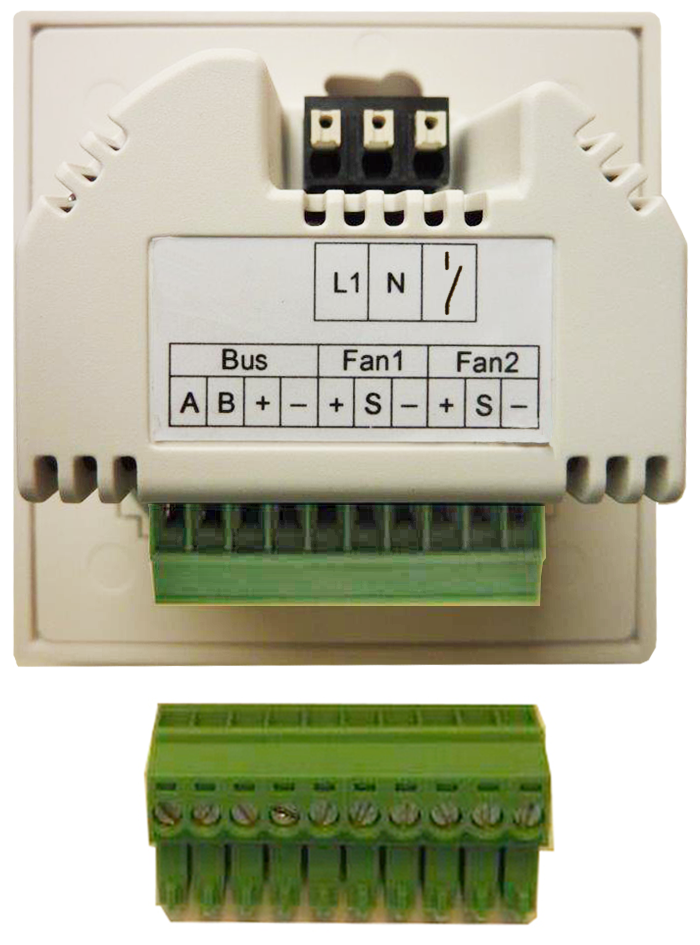
- Take room air control out of flush-mounted box and wire connection cable of additional components to RLS 45 K according to connection diagrams.
- Insert room air control in the flush-mounted box and screw down to flush-mounted box with 4 screws.
- Fit front panel. Make sure it locks into position. When using PP 45 HYI sensors, ensure that sensor opening (hole in front panel) is above the sensor.
- Start up ventilation system, switch sensor to active → Installation instructions for final installation kit, service mode or start up.